LifeCycle Hooks에는 크게 Creation(생성), Mounting(장착), Updating(변경), Destruction(소멸) 이렇게 4단계가 있으며 이번에는 장착 단계에서도 onMounted를 중점으로 Mounting(장착) 단계에 대해 알아보려한다.


Mounting(장착) 단계는 DOM에 컴포넌트를 삽입하는 단계이며, onBeforeMount와 onMounted가 있다.

  • 서버 렌더링에서 지원하지 않는다.
  • 초기 렌더링 직전에 돔을 변경하고자 한다면 이 단계에서 활용할 수 있다.

onBeforeMount

: 컴포넌트가 마운트되기 직전에 호출된다


onMounted

: 컴포넌트가 마운트된 후에 호출되며 DOM에 접근할 수 있는 단계이다. 또한, 모든 자식 컴포넌트가 마운트된 상태를 의미한다.


위에서 정의내린 onBeforeMount와 onMounted 단계를 아래 코드를 통해 차이를 알아보면

onMounted는 컴포넌트가 mounted 된 이후이기 때문에 접근이 가능하지만 beforeMount 에서는 mount가 완료되지 않아 null 값이 출력 되는 것을 볼 수 있다.


<template>
    <div>
        <input ref="inputRef" type="text">
    </div>
</template>

<script>
import { onBeforeMount, onMounted, ref } from 'vue';

export default {
    setup() {
        console.log('setup')
        const inputRef = ref(null)
        onBeforeMount(() => {
            console.log('onBeforeMount', inputRef.value);
        });
        onMounted(() => {
            console.log('onMounted', inputRef.value);
        });
        return { inputRef }
    }
}
</script>


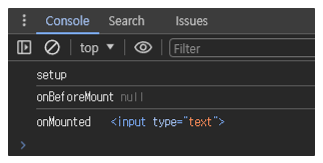
추가적으로, 자식 컴포넌트를 하나 추가하여 자식 컴포넌트에서 Mounting 순서를 같이 출력해보면 부모 컴포넌트에서 먼저 setup 과 onBeforeMount 작업이 실행되고 자식 컴포넌트에서 mounted가 마무리 된 이후에 부모 컴포넌트 mounted 작업이 완료되는 것을 볼 수 있다.


Child Components

<template>
    <div>

    </div>
</template>

<script>
import { onBeforeMount, onMounted } from 'vue'
export default {
    setup() {
        console.log('[Child] setup')
        onBeforeMount(() => {
            console.log('[Child] onBeforeMount')
        })
        onMounted(() => {
            console.log('[Child] onMounted')
        })

        return {}
    }
}
</script>


Parent Components

<template>
    <div>
        <input ref="inputRef" type="text">
        <LifeCycleChildVue></LifeCycleChildVue>
    </div>
</template>

<script>
import { onBeforeMount, onMounted, ref } from 'vue';
import LifeCycleChildVue from './components/LifeCycleChild.vue';

export default {
    components: {
        LifeCycleChildVue,
    },
    setup() {
        console.log('setup')
        const inputRef = ref(null)
        onBeforeMount(() => {
            console.log('onBeforeMount', inputRef.value);
        });
        onMounted(() => {
            console.log('onMounted', inputRef.value);
        });
        return { inputRef }
    }
}
</script>

<style lang="scss" scoped></style>


부모/자식 컴포넌트 Mounting 순서 출력 결과


이 포스팅은 쿠팡 파트너스 활동의 일환으로, 이에 따른 일정액의 수수료를 제공받습니다.


반응형

'프로그래밍 > Vue' 카테고리의 다른 글

[Vue3] Computed  (0) 2024.04.26
Vue.js 2.0 라이프 사이클  (0) 2024.02.21
[Vue.js] Props 란  (0) 2022.06.30
구구단 게임  (0) 2020.07.13


🤔회사에서 Vue 개발을 하면서 computed를 사용하는 경우가 종종 있어 computed 에 대해 알아보려 한다.

 (학습을 위한 정리로 틀린 정보가 있다면 말씀 주시면 감사하겠습니다.)


Computed 사용 및 함수와 차이점

<template> 내 삼항 연산자처리

<template>
  <div>
    <h2>책 제목이 5글자 이상인 경우인가요?</h2>
    <h3>{{ book.title.length > 5 ? '예' : '아니오' }}</h3>
  </div>
</template>

<script>
import { reactive } from 'vue'
export default {
  setup() {
    const book = reactive({
      title: 'vue 학습 책입니다.',
      author: 'test'
    })
    return {
      book
    }
  }
}
</script>


위 코드를 보면 ‘책 제목이 5글자 이상’인 경우를 <template> 안에서 삼항 연산자를 통해 체크하여 ‘예’ / ‘아니오’ 로 출력해주고 있다. 하지만, 이와 같은 코드는 가독성이 떨어지기 때문에 computed 또는 함수를 사용하여 기능을 처리하는 것이 효율적인 코드이다.


computed 사용

<template>
  <div>
    <h2>책 제목이 5글자 이상인 경우인가요?</h2>
    <h3>{{ checkBookTitle}}</h3>
  </div>
</template>

<script>
import { computed, reactive } from 'vue'
export default {
  setup() {
    const book = reactive({
      title: 'vue 학습 책입니다.',
      author: 'test'
    })

    const checkBookTitle= computed(() => {
      return book.title.length > 5 ? '예' : '아니오'
    })

    return {
      book,
      checkBookTitle
    }
  }
}
</script>


method 사용

<template>
  <div>
    <h2>책 제목이 5글자 이상인 경우인가요?</h2>
    <h3>{{ checkBookTitle }}</h3>
    <h3>{{ methodBookTitle() }}</h3>
  </div>
</template>

<script>
import { computed, reactive } from 'vue'
export default {
  setup() {
    const book = reactive({
      title: 'vue 학습 책입니다.',
      author: 'test'
    })

    const checkBookTitle = computed(() => {
      return book.title.length > 5 ? '예' : '아니오'
    })

    const methodBookTitle = () => {
      return book.title.length > 5 ? '예' : '아니오'
    }

    return {
      book,
      checkBookTitle,
      methodBookTitle
    }
  }
}
</script>


위 코드와 같이 methodBookTitle() 함수와, checkBookTitle computed를 사용하여 함수명을 통해 어떤 것을 출력하고 싶은지 예측도 가능하게 된다.

함수와, computed 호출 결과 두 코드는 모두 ‘예’ 로 같은 결과를 보여준다.

그렇다면, 함수와 computed의 차이점을 확인해보면 computed는 cache 기능을 갖고 있다


<template>
  <div>
    <h2>책 제목이 5글자 이상인 경우인가요?</h2>
    <h3>{{ checkBookTitle }}</h3>
    <h3>{{ checkBookTitle }}</h3>
    <h3>{{ methodBookTitle() }}</h3>
    <h3>{{ methodBookTitle() }}</h3>
  </div>
</template>

<script>
import { computed, reactive } from 'vue'
export default {
  setup() {
    const book = reactive({
      title: 'vue 학습 책입니다.',
      author: 'test'
    })

    const checkBookTitle = computed(() => {
      console.log('computed')
      return book.title.length > 5 ? '예' : '아니오'
    })

    const methodBookTitle = () => {
      console.log('methods')
      return book.title.length > 5 ? '예' : '아니오'
    }

    return {
      book,
      checkBookTitle,
      methodBookTitle
    }
  }
}
</script>


위 코드에서 computed인 checkBookTitle 와 함수인 methodsBookTitle() 을 각각 2번씩 호출한 결과

console.log 가 어떻게 찍히는지 확인해보면, ‘computed’ 는 한 번 그리고 methods는 두번 출력된 것을 볼 수 있다.

computed는 내부 데이터 값이 변경되지 않을 경우 cache된 데이터를 가져온다.

Computed get, set

computed의 경우 기본적으로 readonly 속성을 갖고 있어 새로운 값을 할당하려 하면 readonly warning이 뜬다. 이를 해결하기 위해 getter, setter 를 같이 활용해서 사용한다.

아래 소스는 readonly인 computed 값을 변경하려 할때 나오는 warning 예제와 이를 해결하기 위해 사용된 getter / setter 코드이다.


<template>
  <div>
    <h2>책 제목이 5글자 이상인 경우인가요?</h2>
    <h3>{{ checkBookTitle }}</h3>
    <h3>{{ checkBookTitle }}</h3>
    <h3>{{ methodBookTitle() }}</h3>
    <h3>{{ methodBookTitle() }}</h3>
    <h2>author</h2>
    <h3>{{ authorName }}</h3>
  </div>
</template>

<script>
import { computed, reactive, ref } from 'vue'
export default {
  setup() {
    const book = reactive({
      title: 'vue 학습 책입니다.',
      author: 'test'
    })

    const checkBookTitle = computed(() => {
      console.log('computed')
      return book.title.length > 5 ? '예' : '아니오'
    })

    const methodBookTitle = () => {
      console.log('methods')
      return book.title.length > 5 ? '예' : '아니오'
    }

    const authorName = ref('락토')
    const changeName = computed(() => authorName.value + '핏')

    console.log(changeName)
    changeName.value = '지은 이'

    return {
      book,
      checkBookTitle,
      methodBookTitle,
      authorName,
      changeName
    }
  }
}
</script>


Computed getter / setter 사용하여 처리

<template>
  <div>
    <h2>책 제목이 5글자 이상인 경우인가요?</h2>
    <h3>{{ checkBookTitle }}</h3>
    <h3>{{ checkBookTitle }}</h3>
    <h3>{{ methodBookTitle() }}</h3>
    <h3>{{ methodBookTitle() }}</h3>
    <br />
    <h2>author</h2>
    <h3>{{ authorName }}</h3>
  </div>
</template>

<script>
import { computed, reactive, ref } from 'vue'
export default {
  setup() {
    const book = reactive({
      title: 'vue 학습 책입니다.',
      author: 'test'
    })

    const checkBookTitle = computed(() => {
      console.log('computed')
      return book.title.length > 5 ? '예' : '아니오'
    })

    const methodBookTitle = () => {
      console.log('methods')
      return book.title.length > 5 ? '예' : '아니오'
    }

    const authorName = ref('락토')
    const changeName = computed({
      get() {
        console.log('get')
        return authorName.value
      },
      set(value) {
        console.log('set')
        authorName.value = value
      }
    })

    console.log(changeName.value)
    changeName.value = '지은 이'

    return {
      book,
      checkBookTitle,
      methodBookTitle,
      authorName,
      changeName
    }
  }
}
</script>


※ Reference 📑
 Vue Computed 공식 문서 :  https://ko.vuejs.org/guide/essentials/computed


Vue.js

Vue.js - The Progressive JavaScript Framework

vuejs.org


이 포스팅은 쿠팡 파트너스 활동의 일환으로, 이에 따른 일정액의 수수료를 제공받습니다.

반응형

'프로그래밍 > Vue' 카테고리의 다른 글

[Vue3] onMounted  (0) 2024.05.14
Vue.js 2.0 라이프 사이클  (0) 2024.02.21
[Vue.js] Props 란  (0) 2022.06.30
구구단 게임  (0) 2020.07.13

Vue.js 2.0 라이프 사이클

Vue 라이프 사이클이란 Vue 인스턴스나 컴포넌트가 생성되고 소멸되기까진의 단계를 말하며 크게

Creation, Mounting, Updating, Destruction 으로 나뉜다.

<script> 
	new Vue({
		// vue instatnce 생성
	});
</script>


  • Creation돔 이전에 처리되므로 돔에 접근할 수 없다.
    • beforeCreate : 모든 훅 중에 가장 먼저 실행되는 훅
    • Created : data 와 events가 활성화되어 접근 가능하다.
  • 컴포넌트가 돔에 추가 되기 이전으로, Creation 단계에서 실행되는 훅이 라이프사이클 중에서 가장 처음 실행된다. 서버 렌더링에서도 지원되는 훅으로 클라이언트 단과 서버 단에서 모두 처리해야할때 처리하는 단계.


  • Mounting
    • beforeMount
    • mounted : 컴포넌트, 템플릿, 렌더링된 돔에 접근 가능한 단계.
      • Parent, Child mounted의 경우 created 훅은 부모, 자식 순으로 실행되지만 mounted는 child mounted 가 완료된 후에 parent mounted 가 실행되는 순서이다.
  • 렌더링 직전에 컴포넌트에 직접 접근할 수 있는 단계. 초기 렌더링 직전에 돔을 변경하고자 한다면 활용 할 수 있으나 컴포넌트 초기 세팅되어야하는 데이터는 created 단계를 사용하는 것이 주이다.


  • Updating
    • beforeUpdate : 컴포넌트의 데이터가 변하여 업데이트 사이클이 시작될때 실행
    • updated : 컴포넌트의 데이터가 변하여 재 렌더링이 일어난 이후에 실행된다.
  • 컴포넌트에서 사용된 반응형 속성들이 변경 또는 재 랜더링 발생 시 실행된다.


  • Destruction(해체 단계)
    • beforeDestory : 뷰 인스턴스가 제거 되기 직전에 호출된다.
    • destroyed : 뷰 인스턴스 제거가 된 이후에 호출된다.


이 포스팅은 쿠팡 파트너스 활동의 일환으로, 이에 따른 일정액의 수수료를 제공받습니다.


반응형

'프로그래밍 > Vue' 카테고리의 다른 글

[Vue3] onMounted  (0) 2024.05.14
[Vue3] Computed  (0) 2024.04.26
[Vue.js] Props 란  (0) 2022.06.30
구구단 게임  (0) 2020.07.13

Props

📢 Props란 부모 컴포넌트에서 자식 컴포넌트로 데이터를 전달할때 사용되는 단방향 데이터 전달 방식이며
반대 방향으로는 전달되지 않습니다.

또한, 부모 컴포넌트가 업데이트 될 때 마다 자식 요소 prop들도 최신 값으로 업데이트 됩니다.

<div id="app">
    <!-- <app-header v-bind:프롭스 속성 이름="상위 컴포넌트의 데이터이름"></app-header> -->
    <app-header v-bind:propsdata="nameText"></app-header>
</div>

// 자식 컴포넌트
var appHeader = {
    template: '<h1>{{propsdata}}</h1>',
    props: ['propsdata']
}

// 부모 컴포넌트
// 
new Vue({
    el: '#app',
    components: {
        'app-header': appHeader
    },
    nameText: "blackmount22"
})

부모 컴포넌트인 Root 컴포넌트에는 nameText라는 데이터명으로 “blackmount22” 문자열을 갖고 있고, 이를 자식 컴포넌트인 AppHeader 컴포넌트에 데이터를 전달할 수 있습니다.

아래 소스에서 부모 컴포넌트의 nameText 데이터를 자식 컴포넌트의 프롭스 속성 이름인 propsdata에 바인딩 하는 부분입니다.

<app-header v-bind:propsdata="nameText"></app-header>

상위 컴포넌트 (Root 컴포넌트)

하위 컴포넌트 (AppHeader 컴포넌트)

Root 컴포넌트의 nameText: “blackmount22” 값이 AppHeader 컴포넌트의 propsdata에 들어간 것을 확인 할 수 있습니다.

참고

https://kr.vuejs.org/v2/guide/components.html

반응형

'프로그래밍 > Vue' 카테고리의 다른 글

[Vue3] onMounted  (0) 2024.05.14
[Vue3] Computed  (0) 2024.04.26
Vue.js 2.0 라이프 사이클  (0) 2024.02.21
구구단 게임  (0) 2020.07.13

아래와 같은 script src 경로로 vue 호출

    <script src="https://cdn.jsdelivr.net/npm/vue/dist/vue.js"></script>


<!DOCTYPE html>
<html lang="en" dir="ltr">
  <head>
    <meta charset="utf-8">
    <title>좋아요</title>
    <script src="https://cdn.jsdelivr.net/npm/vue/dist/vue.js"></script>
  </head>
  <body>
    <div id="root">
      <div>{{first}}곱하기 {{second}}는?</div>
      <form v-on:submit="onSubmitForm">
        <input type="number" ref="answer" v-model="value"/>
        <button type="submit">입력</button>
      </form>
      <div id="result">{{result}}</div>
    </div>
  </body>

  <script type="text/javascript">
      const app = new Vue({
        el: '#root',
        data: {
          first: Math.ceil(Math.random() * 9),
          second: Math.ceil(Math.random() * 9),
          value: '',
          result: '',
        },
        methods: {
          onSubmitForm(e) {
            e.preventDefault();
            if(this.first * this.second === parseInt(this.value)) {
              this.result = '정답';
              this.first = Math.ceil(Math.random() * 9),
              this.second = Math.ceil(Math.random() * 9),
              this.value = '';
              this.$refs.answer.focus();
            } else{
              this.result = '땡';
              this.value = '';
              this.$refs.answer.focus();
            }
          },
        },
      });
  </script>
</html>


정답이 맞을 경우 first / second 값을 랜덤 처리로 호출하며 구구단 처리 소스

[참조]

https://www.youtube.com/watch?v=TIHluPn05VY&list=PLcqDmjxt30RsdnPeU0ogHFMoggSQ_d7ao


반응형

'프로그래밍 > Vue' 카테고리의 다른 글

[Vue3] onMounted  (0) 2024.05.14
[Vue3] Computed  (0) 2024.04.26
Vue.js 2.0 라이프 사이클  (0) 2024.02.21
[Vue.js] Props 란  (0) 2022.06.30

+ Recent posts